
Introduction
After completing the Exploit Education Phoenix challenges, I started looking to advance my exploit development learning. A good next step would be learning about Return Oriented Programming (ROP) to defeat exploit mitigations such as Data Execution Prevention (DEP)/No-Execute (NX). ROP Emporium should be a great place for that. There are a total of 8 challenges on the site that (sort of) progress in difficulty.
ROP Emporium Challenges
Of course, you should never run un-trusted binaries on your regular computer. I’ll be working in a VirtualBox VM running Arch Linux. It’s not that I don’t trust the ROP Emporium creators, it’s about maintaining good habits.
Each challenge has a 32-bit and 64-bit version. If there’s a difference between the two (aside from addresses), I’ll try to complete the challenge for both.
radare2
Aside from learning ROP, my alternative goal is to learn how to use radare2, an open source, fully-featured reverse engineering and debugging framework. The ROP Emporium Beginner’s Guide even states that radare2 should have everything you need to complete every challenge on the site. So every challenge I attempt here, I’ll use radare2 as much as possible. Installing radare2 in Arch Linux is as simple as $ sudo pacman -S radare2. I’m sure a package exists for most package managers in other distros. Otherwise, you can just install from their GitHub repo.
Getting Help
One thing you’ll discover very quickly about radare2 is that it has a very steep learning curve. And as they say, the best way to learn something is to teach it to someone else. I think the hardest part of learning radare2 is remembering all the commands. Fortunately, it has a very good, hierarchical help system. Simply entering ? without anything else gives you the top-level help menu. Since ret2win is the first challenge, I’ll use that binary as an example:
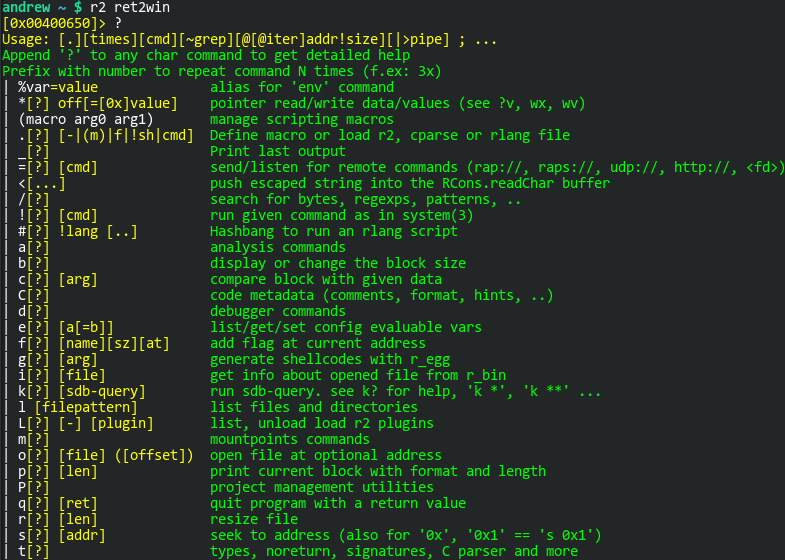
The radare2 prompt starts you off at the entrypoint address for the binary. Let’s use the help menus to figure out how we can verify that. I know that I want to get “information” on the binary. The entrypoint address is listed in the ELF header. With any of these commands, you can append a question mark to the end to get the next level of help. Another nice feature is the internal grep command. The tilde (~) character will allow you to grep the output. Following that with a plus (+) makes the search case insensitive:
[0x00400650]> ? ~+ info
| i[?] [file]             get info about opened file from r_bin
So we’ll probably want the “i” command. Let’s see what we can glean from that:
[0x00400650]> i? ~+ entry
| ie                 Entrypoint
| iee                Show Entry and Exit (preinit, init and fini)
[0x00400650]> ie
[Entrypoints]
vaddr=0x00400650 paddr=0x00000650 haddr=0x00000018 hvaddr=0x00400018 type=program

1 entrypoints
And there it is, the virtual entrypoint address is 0x00400650. As we move around the binary, that prompt will change.
Customization
There’s a lot you can do to customize radare2. I know I’ve only scratched the surface. Much like the ~/.gdbinit file that can customize your GDB environment, you can use a ~/.radare2rc file. Here are the customizations I’ve made so far. I’m sure I’ll keep modifying this file.
# Disable fortunes
e cfg.fortunes = false

# Enable truecolor
e scr.color = 3

# Start at main() in debug mode
e dbg.bep = main

# Set the prompt to follow PC in debug mode
e dbg.follow = 1

# Do not show instruction bytes
e asm.bytes = false

# Use UTF-8 to have pretty arrows and borders
e scr.utf8 = true

# Set the color theme to bright
eco bright